A Pan of Focaccia Built for Tomorrow's Lunch
A shallow pan, a cold overnight rise and one generous layer of olive oil turn a wet dough into bread that slices neatly for sandwiches.
8 min read
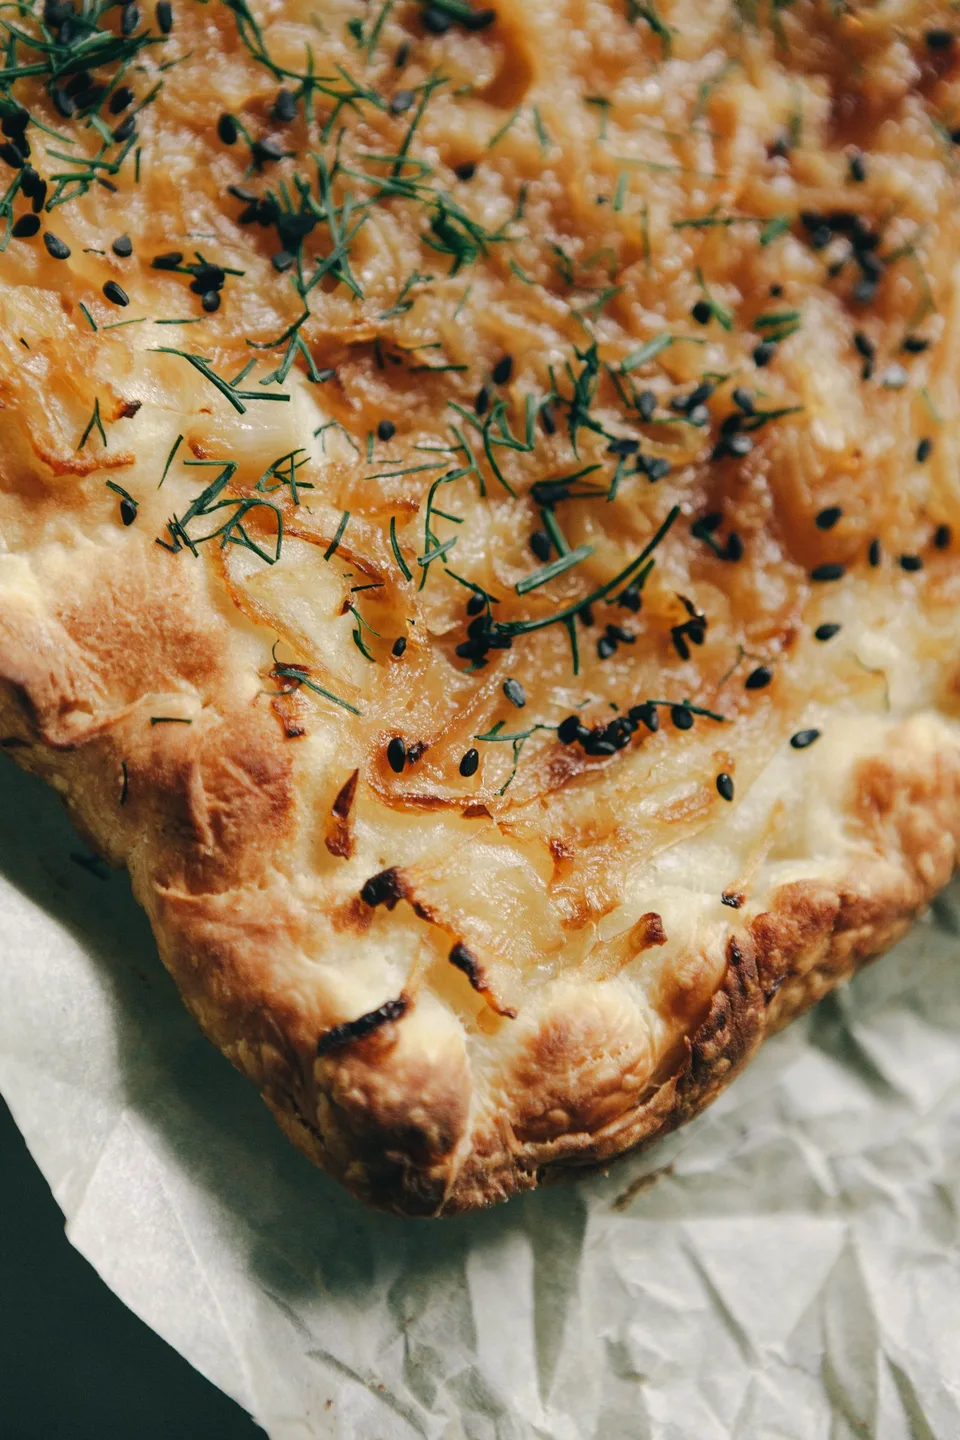
A tall square of focaccia can be a pleasure at dinner. Try to eat the same square as a sandwich and the pleasure may end with the first bite. The bread is too high for a comfortable mouthful, the filling squirts toward the plate and an attractive open hole has given the mustard somewhere to hide. Focaccia intended for lunch needs a different shape. It should have a crisp bottom and a gently uneven top, with a crumb broad enough to slice horizontally and steady enough to keep a tomato in place. That starts with spreading the dough in a pan that seems almost too big for it.
This is a loaf that can be mixed after dinner and baked the following morning. The refrigerator does most of the scheduling. You only need to be around for a short series of folds at the beginning and enough time for the dough to settle into its pan later. The pan used here measures about 9 by 13 inches, with sides high enough to contain the dough. Choose a plain sturdy metal one if possible. A thin, dark tray can brown the underside quickly, while a heavy casserole dish may produce a softer base.
An evening mix without a mixer
For one pan, weigh 400 grams bread flour, 320 grams lukewarm water, 8 grams fine salt and 2 grams instant yeast. Set out about 45 grams olive oil, divided between the bowl, pan and surface. A teaspoon of chopped rosemary and a few pinches of flaky salt are enough topping. The bread will have more room for other flavors at lunch if the top stays simple.
Combine flour, yeast and fine salt in a large bowl and add the water. Stir with a broad spoon until the flour is hydrated. Scrape the sides and bottom, as dry flour can hide in a crease of dough. The mass should feel too sticky to knead neatly. Resist dusting it with flour to make it tidier. Extra flour turns a simple wet dough into a tighter one, and some of it ends up on the bench anyway. Cover the bowl and leave it alone for twenty minutes.
Wet one hand. Lift an edge of the dough and fold it over itself. Turn the bowl a quarter turn and repeat until you have folded four sides inward. The first turn may look like dragging a piece of fabric out of water. On later turns you should feel the dough hold together and stretch more cleanly. Cover it again. Repeat the set twice at roughly twenty-minute intervals. A set of folds takes under a minute, so you can do them in between other small kitchen jobs. If the dough tears, lift less high. The object is to stretch what will move easily.
Pour about a teaspoon of olive oil down the side of the bowl after the final fold. Lift the dough just enough for the oil to run underneath. Cover well so the surface stays moist and refrigerate overnight. A rigid cover with enough room to rise is convenient. A cloth alone lets the dough dry out and can stick to its top. If your refrigerator runs particularly cold, the dough may grow only a little. It will still have time to move after it comes out.
Get the dough across the pan
The next morning, pour about two tablespoons of oil into the pan. Tilt it until the base is covered and use your fingertips or a brush to slick the corners and the lower edges of the sides. Be especially thorough where the bottom meets the short ends. Bread sticks most stubbornly where a pool of oil never reached. A piece of baking parchment beneath the oiled dough can help release if you know your pan is troublesome, though it may yield a slightly different crust.
Scrape the dough gently into the pan. Turn it over once to coat both sides. Spread it from the middle with oiled fingers until it begins to resist. If there is still an inch of exposed metal around it, cover it for fifteen minutes and try again. The second stretch usually goes farther with less effort. Avoid dragging out a thin flap by pulling from one corner. Ease several points along an edge and let the middle settle gradually into the new space.
Give the dough roughly an hour to become visibly puffy. A cold kitchen or very cold dough may need longer. Look for soft bubbles just under the surface and a gentle jiggle when you move the pan. A finger touched to the surface should leave a shallow mark that does not immediately snap back. If the dough is still tight and barely reaches the corners, let it sit a little longer before dimpling. Cover it loosely so the cover can come off without pulling at the top.
Dimple just enough to gather oil
Heat the oven to 425°F or about 220°C with a rack in the lower middle. Drizzle the remaining oil over the dough. Dip your fingers in the oil and press them straight down at regular intervals. The goal is to make dimples, leaving the larger bubbles between your fingers intact. Pressing your entire palm over the top drives out more of the rise than necessary. If a large bubble looks as though it will turn into a blister that blocks a slice, prick that bubble and leave the others alone.
Scatter the chopped rosemary and flaky salt. A light hand with the salt matters because the eventual filling may bring cheese, mustard, pickles or olives. For a bread with a softer herb aroma, rub rosemary through the surface oil with your fingers before pressing the dimples. It will sit in the small pockets rather than standing on exposed tips. Fresh herbs can darken where they dry out. If that bothers you, add part of the rosemary in the last few minutes or scatter fresh leaves over the warm loaf instead.
Bake for about 22 to 28 minutes. Begin looking when the raised ridges turn golden and the dough pulls away from one edge. The bottom should be evenly browned and firm when lifted a little with a thin spatula. If the top is ready and the base seems pale, move the pan down a rack for the final few minutes and watch closely. If the underside browns faster, do the reverse. The two surfaces respond to different parts of the oven. Use that difference in the last stretch of the bake.
Cool it before making a plan for the middle
Let the bread rest in the pan for a few minutes, then work a spatula around the corners and slide it onto a rack. The rack keeps steam from gathering against the crisp bottom. Wait until the bread is close to room temperature before slicing it. A warm crumb compresses more easily and can adhere to the knife, making the center look gummy even when the loaf was fully baked.
Cut the bread into rectangles, then hold each rectangle flat with your palm and use a serrated knife to cut through its center. Turn the piece halfway through if the crust resists. You can also split one long section, fill it as a slab and cut it into individual sandwiches afterward. For that method, line up the fillings before adding the lid. A strip that contains only lettuce next to one crowded with roasted vegetables will produce two very different sandwiches.
The crisp base is often the better side for a moist filling. Its surface holds up to a thin layer of mustard or soft cheese. Dry sliced cucumbers and tomatoes on a clean towel before stacking them. A leaf of lettuce on either side of a wet ingredient makes a reasonable barrier, but there is no need to turn a sandwich into an engineering project. At home, simply add the tomato at the end. For a lunch carried across town, pack very juicy pieces separately and slip them into the bread just before eating.
A sandwich with a hard cheese benefits from thinner bread than one filled with soft vegetables. If two people want very different lunches, split one of the rectangles unequally. The thicker half can hold an open-faced topping, while the thinner half toasts into a crisp side. There is no need to trim away good crust to make the pieces match.
Use the pan to adjust the next batch
A sheet that comes out too thick for a sandwich can be excellent next to soup. If you want to change its shape, increase the pan area a little while keeping the dough quantity the same. Watch it earlier in the oven because the thinner middle cooks faster. If the bread sticks, inspect the place it stuck. A single bare corner calls for a little more careful brushing. A uniform layer stuck all along the base is a good reason to use a different pan or try parchment.
Leftover pieces freeze well when cooled and individually wrapped. Thaw what you need and warm it briefly in an oven or skillet to firm the surface. A thin piece can also be toasted whole and served open-faced, which saves you from splitting a small awkward heel. If yesterday's bread takes another turn as lunch, the original pan has done its job. It made bread that is good straight off the rack and still has a useful shape once the dinner dishes are put away.